Kansas has its own licensing requirements. They can vary by type. In general, you must have a degree in construction, a valid photo I.D., and proof of business registration. To prove your training, you might need to take either the Prometric (or International Code Council) exam depending on which industry you work in. You can find information about Kansas' requirements for contractors licenses and how to apply.
Licensing requirements for contractors in Kansas
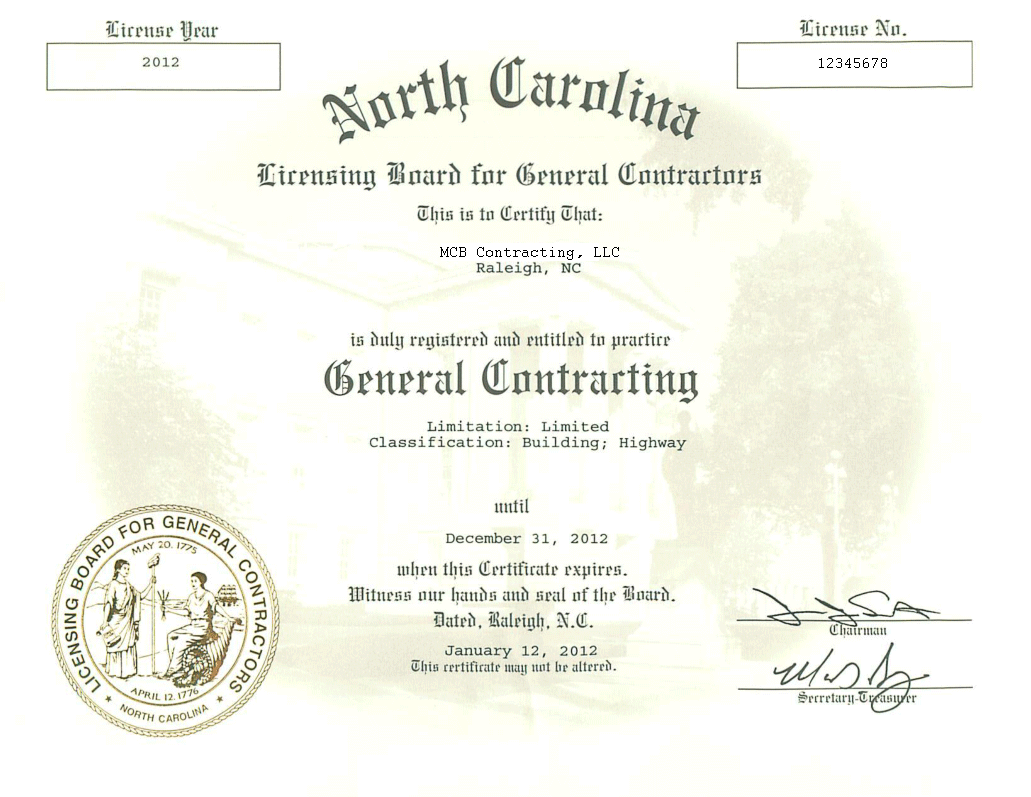
You may be curious about Kansas licensing requirements if you plan to open a Kansas construction company. No matter whether you are an individual, or a small-business owner, licensing requirements must be followed. All owners, officers and partners must sign the letterhead of the company proving authority. There may be fees for licensing, depending on the work you are planning to do and your career goals. These fees can vary from one place to the next. Make sure to review the requirements before you apply.
Contractors in Kansas must also submit a digital photograph of themselves. Kansas Department of Revenue is the state's taxation director. Contractors who are not Kansas residents must register their contracts. Contractors must also register their business with the local municipality. This may be required licensing. A contractor's license has many advantages. It increases credibility and builds trust among clients.

Bonding requirements
Kansas has a number of industries and professions that require contractors to be licensed before they are allowed to perform public construction work. Kansas doesn't require contractors to be bond, but many local governments and cities require them. They are usually required to bond for certain types or work, such as plumbing, drainage, sewer, and electrical. The Spotlight article below explains the bonding requirements to obtain a Kansas contractor license.
Surety bonds usually cost between one percent and five percent of project total costs. Bonding premiums can vary depending on coverage and bond amount. Different industries may require a different type or bond, such as construction or demolition. A contractor license bond is usually required by the county or city where the project is being done. It is possible to get a bond as low as $100, depending on your industry.
Insurance requirements
To become a Kansas contractor, you will need to meet certain insurance requirements. These may range from financial solvency insurance to general liability. Kansas law requires both, as homeowners may sue for damages from defective materials or workmanship. In certain cases, you might also need to provide a bond to ensure payment. Additional obligations may apply if you have employees. Find out more about these requirements, and how you can comply.
Kansas offers two types contractor licenses: the Class A and the Class B. These are general contractor licenses, which allow you the ability to perform residential, commercial and pool construction. However, you cannot perform HVAC, electrical, plumbing or landscaping work. Register your business and pass an examination. Only Topeka will be able to take the exam. After passing this exam, you will be able to obtain a license.
Exemptions
Concordia, Kansas has exemptions for contractors. These include either a temporary license or a general contract license. Before you can work with Concordia, there are some requirements you will need to meet. Taxes can be avoided by obtaining a Kansas contractor's license. Read on to learn more. This article will explain the basics of Kansas contractor licensing law.
A Class A license is required for general building construction. This license is for non-structural remodeling or construction such as installing shingles. It doesn't allow you to perform any plumbing, electrical, or HVAC work. Also, you must register for a business licence. For you to qualify, you may have to attend classes. If you're working in Topeka, you can obtain a specialty trade license from the MABCD.
FAQ
Are handyman services more expensive than general contractors?
Yes! Yes! This is especially true in cases where you have never hired a contractor to do the work. Because they have the expertise to complete certain tasks more quickly and efficiently, a handyman can speed up the project's completion.
Is it worth paying more for professional handyman service?
It all depends on what type of project you are looking to accomplish. If you need a complex construction project like an office renovation, then a professional handyman service would definitely be beneficial.
How often should I use a handyman for my job?
It all depends on what your project is. If you are looking for a quick fix, like installing a lightbulb, you may only need one handyman per week. But, if you have a lot to remodel, you may need multiple handymen.
Are handymen insured?
Yes! Yes. Most insurance companies cover liability claims over $1 million for accident property damage or bodily harm. Your insurance company will typically compensate you for damages if there is a problem during the project.
What qualifications are necessary to be a handyman
A handyman's most important attribute is patience. Experience with electrical systems, plumbing skills, and home maintenance is a must.
You will find that there are many jobs available for those who are qualified, but if you don't know what they are, then you may not qualify.
This is why you might consider enrolling in a school that specializes in these types of courses.
Can a handyman fix my leaking faucets
Although a handyman can handle minor repairs, he won't have the skills to complete major projects like wiring a house and installing custom cabinets. Handymen can complete minor home improvement tasks.
Should I pay a handyman by the hour or per-project basis?
Personal preference will dictate the final price. To know the exact cost of a handyman's services, some prefer to pay by the hour. Others prefer to be paid for each job completed, since they may need multiple jobs at the same time. Either way, it's fine.
Statistics
- Our handyman services for seniors are provided by professional senior helpers who have been serving the community for over 20 years with 98% customer satisfaction. (cantatahomeservices.org)
- Another estimate was that the market in the United States was $126 billion and was increasing by about 4% annually. (en.wikipedia.org)
- With a strong housing market, the handyman and general maintenance worker industry are expected to grow by nearly 10% in the next decade. (housecallpro.com)
- “Once the pandemic hit, that number fell to about 20%.” (inquirer.com)
- A franchise was approximately $110,000 with a franchise fee of $14,900, according to a spokesperson for a national handyman franchise. (en.wikipedia.org)
External Links
How To
How to replace a broken tile
Step 1: Take away the old tiles.
Take out the tiles and place them on a new flooring surface. These tiles will be useful later on, so you'll need to keep them intact. If they're damaged or missing pieces, note which ones they were so you don't run into problems finding replacements.
Step 2: Choose New Tiles
Check out these options for tile replacement.
-
Locate a replacement tile that is the same as the one you just removed.
-
To find the matching piece, use the measurements that you took while removing the tile. This will make it easy to get the correct size without having again to measure.
-
Find colors, patterns textures, sizes and shapes in all possible combinations.
-
Consider what grout you prefer to use. Some people prefer to use a single color, while others love mixing it up.
-
Make sure the tile you select is resistant to moisture.
-
Consider the location of your tile. You can save both time and money by making sure that there is enough room for proper installation.
-
Once you've decided on your tile, you can order it online or by calling your local Lowe's to place your purchase.
Step 3 – Install the new tiles.
Use the same method as before to install your new tiles. You must align them correctly to ensure they fit together.
Step 4 - Clean Up
Clean up any debris on the floor before you apply the last layer of protective material.
This will keep dust and dirt from getting into the grout between tiles, which could lead to mold.
Step 5 – Sand down the floor
After cleaning, sand the floors to remove any particles.
Step 6 – Finish Off
After the floor has been smoothed, you can apply protective coatings to the tiles. Because wet paint can cause damage to the tiles' surfaces, it is important that you wait.
You can always use a "damp and dry" product on your floors to protect them from staining.
It will not address all problems that may arise once your tiles have been installed. Consider adding an anti slip coating to your protective layer if you have kids.
Remember to let the protective sealer remain on for several additional weeks before you move into your home.