While you might have seen DIY videos on how to install shiplap on walls or ceilings, you don’t know how it works. You'll learn how you can nail shiplap to studs, stagger and more. Additionally, you will learn about the cost and type to use shiplap. Continue reading to learn more! We all have wondered: "How can I install shiplap?"
How to staggerered shiplap
If you are considering installing shiplap on your walls, you may be wondering how to achieve a staggered appearance. This type of shiplap uses boards that are separated so that they do not meet at the same point on all sides. A stud finder will help you to determine the location of your shiplap. Place the first row on one side and then stagger the shiplap on another.
After you have selected your boards, you need to buy shiplap adhesive. This adhesive is similar in function to a metal caulk guns and can be found at hardware stores. It is important to ensure that all adhesives are clearly labeled on the package. This adhesive is best used indoors. After you have selected the right adhesive, it's time to nail each board onto the wall. You can apply the adhesive at either the top or bottom. The adhesive will keep the shiplap boards in place by gravity.

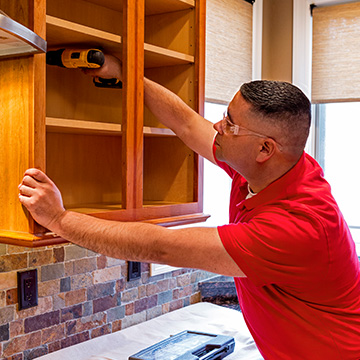
How to attach shiplap to studs
Installing shiplap is fairly easy and can be done with either nails or construction adhesive. Start by attaching the first board to the bottom corner. Using a level to make sure the studs are aligned, nail the board at two points along each stud. Once you have completed the row of shiplap, repeat the process for the next boards. Spacers are used to create the signature gap in shiplap.
If you're working with existing drywall, it is important to locate any drywall before nailing shiplap into the studs. A stud finder is a good tool to locate the studs. If you cannot find the studs, use chalk to mark them. This will stop shiplap being incorrectly installed. Once you have found the studs and located them, you can apply shiplap to the walls.
Shiplap Cost
How much does it take to install shiplap on walls? The price of shiplap is dependent on its size, type of wood, and labor. Costs for interior installations can range from $500 to $1,500, depending on the size of the wall. The typical homeowner will spend $500-$1,500. The price of installing it yourself can be higher depending on the size of your room. This article will explain how much it costs for shiplap to be installed and what the best option is.
Cedar and hardwood are the most commonly used materials to make shiplap. Hardwood prices range from $0.80 to $4.00 a square foot depending on the quality of the wood or the manufacturer. Prices will depend on the size and amount of shiplap required. A home with 500-3,000 square feet will need approximately $4.00 per foot of exterior walls. Cedar is more expensive, however it offers a more refined look.

The right type or shiplap
There are several types of shiplap available, including plywood, pine and medium density fiberboard. You will need to choose a different material depending on the width of your shiplap boards. Pine can be difficult to work with, but plywood and MDF are easier to work and produce the same effect as shiplap. A great option for homeowners with limited budgets is plywood. It is lighter than MDF and is smoother.
Choose the type of shiplap that suits your style. Shiplap was originally used by the Vikings for building boats. The planks were interlocking, waterproof, with grooves along the edges that allowed precise overlapping. Shiplap boards were narrower than usual, allowing them to fit together tight and stack up. Modern shiplap doesn't necessarily follow these rules, and it often is made from low-maintenance materials, like MDF.
FAQ
How do I locate a trustworthy handyman
You should always get references before you hire a handyman. Ask family and friends who have worked with him or her before. Look online too - there are many sites where handymen leave reviews.
How often should I employ a handyman to help me?
It all depends upon the nature of your job. If you are looking for a quick fix, like installing a lightbulb, you may only need one handyman per week. However, if there is a lot of remodeling involved, you could probably use several handymen over the course of the project.
Which is easier: contracting or being a handyman?
Handyman work requires less resources than contracting because you only need your own tools. While contractors often rely on subcontractors, handymen must be able and willing to manage their own work schedules.
How long does it take to become a handyman?
It takes many years of hard work to become an expert handyman. It often starts by helping family members and friends, and then grows into a full-time job.
As you progress, you will learn all the necessary skills.
What does the average handyman charge an hour?
Handyman fees range from $50 to $75 per hour. Many have been doing this job for many years. The average time they spend on any job is around 10 hours. They do not need to be advertised; they are well-known in the area.
They have a tendency to be specialized and develop customer relationships over time.
They are quick, reliable, and affordable. This is the key difference between them and other contractors.
Most people have at least two or three of these guys that they can trust enough to call for help when they need it.
Some people are so talented that they own their own business.
When is the right time to hire a handyman?
There isn't really a "right" time to hire a handyman. You just need to get started as soon possible. To save money, you could wait until after the holidays. You could also pick up the telephone and call various handymen.
Are handymen insured?
Yes! Yes. Many insurance companies cover liability claims that exceed $1 million for bodily injuries and property damage. Your insurance company will usually compensate you for any damages that occur during the project.
Statistics
- Another estimate was that the market in the United States was $126 billion and was increasing by about 4% annually. (en.wikipedia.org)
- An estimate was that in 2003, the market for home maintenance and repair spending was up 14% 2001 to 2003. (en.wikipedia.org)
- More than 20% of homes in America have outdoor living spaces, including decks and patios. (mrhandyman.com)
- “Once the pandemic hit, that number fell to about 20%.” (inquirer.com)
- With a strong housing market, the handyman and general maintenance worker industry are expected to grow by nearly 10% in the next decade. (housecallpro.com)
External Links
How To
How to Replace a Broken Tile
Step 1: Take away the old tiles.
You can remove the old tiles from your floor and save them. These tiles should be kept intact in case you need them again. If they're damaged or missing pieces, note which ones they were so you don't run into problems finding replacements.
Step 2 -- Choose New Tiles
Check out these options for tile replacement.
-
You can find a tile replacement that is similar to the one you have just removed.
-
To find the matching piece, use the measurements that you took while removing the tile. This will make it much easier to find the right size without measuring again.
-
Be open to different colors, patterns or textures.
-
If you have a preference for grout, consider what it would be best to use. Some people prefer a certain color, others like to mix it up.
-
You should ensure that the tile you choose is resistant to moisture.
-
Finally, consider the placement of your new tile -- you can save time and money by ensuring the area you're installing it in has enough space for proper installation.
-
Once you've decided on your tile, you can order it online or by calling your local Lowe's to place your purchase.
Step 3 - Place the tiles.
Install your tiles using the same method you used before. It's important to align them correctly in order for them to fit together.
Step 4 - Clean Up
Make sure to clean up all debris and other materials before applying the final layer of protection material.
This will keep dust and dirt from getting into the grout between tiles, which could lead to mold.
Step 5 - Sand the Floor
After cleaning, sand the floors to remove any particles.
Step 6 – Finish Off
Apply the protective coatings once the floor is smooth. It is important to wait before you apply the protective coatings.
To help prevent stains, you could always use a product called 'damp-anddry' on your floors.
It will not address all problems that may arise once your tiles have been installed. If you have children, an anti-slip coating may be a good idea.
And finally, remember to leave the protective sealer on for several weeks before moving back into your home.